In our previous post about the Neptune Web Edit CMS Form Builder Module, we touched briefly on some features and benefits. Below are more details and information on its usage and setup.
In our sample CMS site the module is located in the usual place along with other modules under "Manage Files" and in this case is called "Contact Forms". Each item in the module is a separate submission form. There are two forms created in the screenshot below: "Campaign one" and "Small form".
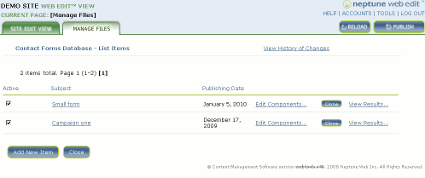
How to create a form
In the Forms Database click on "Add New Item". You are taken to the Form settings screen.
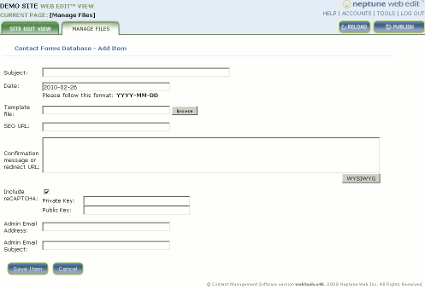
- Enter the form name in the subject field. Select a template file on which the form will appear. Optionally enter an SEO URL of the form.
- In the "Confirmation message or redirect URL" field please enter either a message that will be displayed after the form is submitted (a thank you message) or a URL where the visitor will be redirected after submitting the form.
- You can add captcha validation to the form by selecting the "Include reCAPTCHA" checkbox and providing your public and private keys for the reCAPTCHA service.
- Finally each submission can be emailed to a predefined administrative address when you provide the Admin Email Address and Subject.
Once the form information is entered you click on "Save Item" which takes you back to the page listing all forms. There, you want to click on "Edit Components..." to add form fields.

Add form fields and components
On the Form Components screen you will see a list of existing fields of your form. To add a new field please enter its Name (this will be the label displayed next to the field), then select its Type from the dropdown and click on "Add". This will take you to the Component Edit screen.
Once on the Component Edit screen you will enter information about the specific form field you are adding. Please note that depending on the field type you are editing the edit page will have slightly different choices.
For example a text field will have the following options:
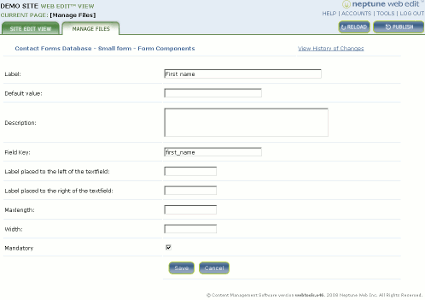
- Label - name/title of the field eg. First Name
- Default value - the initially prefilled text
- Description - additional text displayed next to the field
- Field Key - unique field identifier (used as the field's name attribute in HTML)
- Label placed to the left of the textfield - text displayed before the field eg. $
- Label placed to the right of the textfield - text displayed after the field
- Maxlength - the number of characters allowed to enter into the field (same as the maxlength attribute in HTML)
- Width - field width (same as the size attribute in HTML)
- Mandatory - where a value must be entered into the field
On the other hand, a select (eg. drop down) field has the following options:
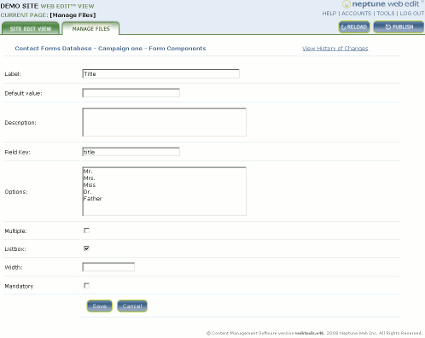
- Label
- Default value
- Description
- Field Key
- Options - list of items to select from, one per line
- Multiple - whether to allow choosing more than one item
- Listbox - whether to display the field as a list (drop down) or a set of check boxes
- Mandatory
Example renderings
Once you create a form you want to go to see it on the actual web page. Below are two sample renderings of two forms.
A submission form in the center area of the page, including captcha validation:
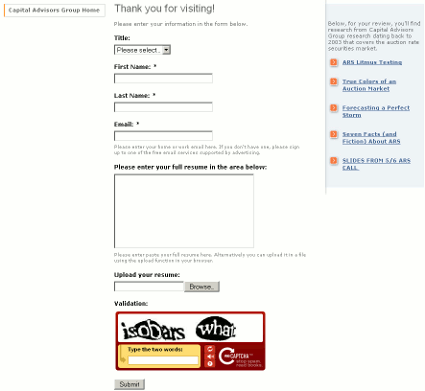
A form in the right hand column of the page:

Results Database
The submissions are stored in the database and available to list or download from the "View Results..." link on the Form Listing page.
Page set up
A page where the form appears needs to have the form invocation code added on it. It is referred to as a template file. It is basically a web page on which the form will appear and is specially prepared to handle forms from the module. Each template file can handle just one form (you cannot assign the same template file to more than one form). If you need to create a new form then you typically also need to create a new template file for it. The easiest way is to create a copy of the existing template file under a new name.
The following PHP code will be included where the form should appear:
<?php

getModule("webformsdatabase");
$nwWebForm = new webformsForm();
$nwWebForm->renderForm();

?>
The above code will search through the forms database to find the first form item where the template name matches the current page url.
CMS configuration
Here is a sample of config.ini settings:
[webformsdatabase]
sections=Contact Forms
uploaddir=/home/form-uploads/
dbhost=localhost
dbpassword=password
dbuser=username
dbname=database_name
The fields worth mentioning:
- uploaddir:
-
Specifies where the submitted files (uploaded using the file form field) will be saved.
- dbhost, dbuser, dbpassword, dbname:
-
Live database connection. This is where submissions will be saved.
[webformsdatabase Contact Forms]
fields=subject,url,template,pubdate,redirect,captcha,adminemailaddress,adminemailsubject
preview=/nw_content_manager/modules/webformsdatabase/html/index.php?section=Contact%20Forms
inputfiles=_genseo1.php
outputfiles=.htaccess
The fields worth mentioning:
- redirect field
-
Enable the redirect field on the Form Edit page in the CMS to define a url to redirect to after submitting the form. If the field value doesn't look like a url then it's assumed to be a thank you message text that is displayed after submitting the form.
- inputfiles and ouputfiles:
-
This is the mechanism that we use to create SEO redirects. The input file will generate a standard .htaccess file for Apache that will contain the rewrite rules for redirects. If there is another module, section or mechanism which uses the .htaccess file then it will have to write to another file (both sections can not write to the same .htaccess file). The Apache configuration will need to be updated for this case to read both files, using for example the Apache Include directive.
As you can see from the above presentation, the module adds a valuable function to the Neptune Web Edit CMS that allows CMS users to have more control over the forms and easily create new forms typical for contact or landing pages. Once set up, using the module is really easy and will save hours of work that would be needed to maintain form pages.

